From Napkin Sketch to Clickable Prototype: Rapid Validation with limerIQ
Turn a product idea into a working prototype in hours, not weeks
You have an idea. Maybe it came during a shower, a meeting, or a late-night conversation. You can see it clearly in your head - the screens, the flow, the moment when a user would say "this is exactly what I need."
But between that vision and something you can actually show people sits a frustrating gap. Design mockups take days. Developer time costs thousands. And by the time you get something clickable, the opportunity may have passed.
What if you could go from napkin sketch to clickable prototype in a single afternoon?
The Validation Problem
Traditional product validation follows a slow path:
- Write a spec - Days of documentation
- Create wireframes - Design tool back-and-forth
- Build mockups - More design time
- Wait for development - Weeks, if you can get priority
- Finally demo - Stakeholder feedback reveals you missed something
- Start over - Iterate through the entire cycle again
By the time you have something to show, you have invested weeks of effort. And often the feedback is "this is not quite what I had in mind."
The problem is not the feedback. The problem is how long it takes to get it.
A Faster Way: Prototype-First Validation
The key insight is simple: you do not need a production-ready product to validate an idea. You need something people can click through and react to.
A clickable prototype serves three critical purposes:
1. It Forces Clarity
When you describe an idea verbally, ambiguity hides in the gaps. When someone clicks through a prototype, every missing piece becomes obvious.
2. It Gets Real Feedback
Static mockups and slide decks let people nod along. Clickable prototypes make people say "wait, what happens when I click this?" - which is exactly the feedback you need.
3. It De-Risks Investment
Building the wrong thing is expensive. A two-hour prototype that invalidates an idea saves weeks of wasted development.
How the Rapid Prototype Workflow Works
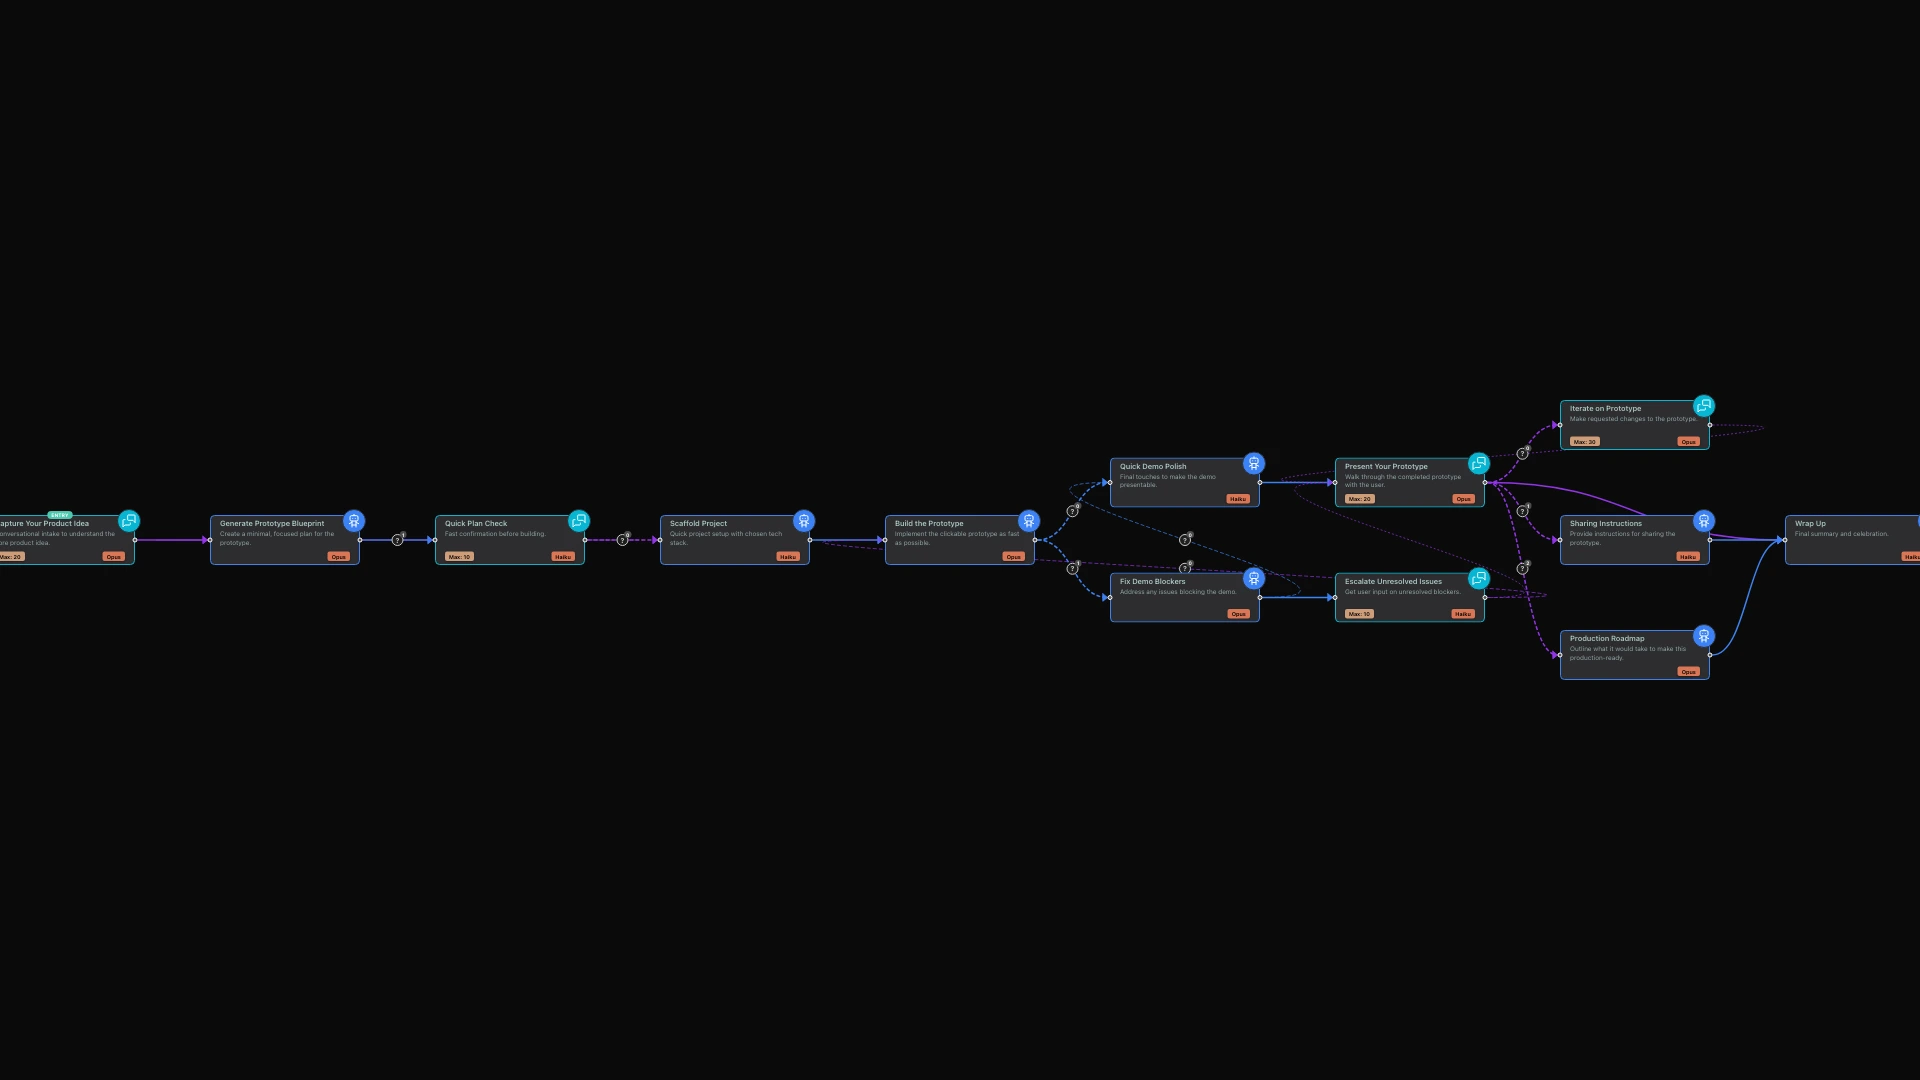
The limerIQ rapid prototype workflow is designed for one thing: getting to a clickable demo as fast as possible. Here is how it works.
Phase 1: Conversational Idea Capture
Instead of writing a formal spec, you have a conversation. The system asks focused questions:
- What is this product in one sentence?
- What is the ONE user journey to demonstrate?
- What is the "wow moment" that makes people get it?
- What visual style fits the concept?
The key here is restraint. The workflow deliberately avoids asking about testing strategy, deployment plans, scalability concerns, or documentation. Those are production problems. This is about validation.
You might be surprised by how few questions you need to answer. The goal is to capture enough to build a demo, not enough to build a production system. Three to four focused questions typically suffice.
Phase 2: Minimal Blueprint Generation
Once the idea is captured, the system generates a prototype blueprint. This is not a comprehensive product roadmap - it is a build plan for a 2-4 hour sprint.
The blueprint includes:
- 3-5 screens maximum - Just enough to demonstrate the core flow
- Standard UI components - No custom design system work
- Hardcoded mock data - Realistic but static
- The critical click path - What users will actually interact with
Technology choices are deliberately opinionated and optimized for speed. The system selects frameworks and component libraries that minimize setup time and maximize the ratio of building to configuring.
Phase 3: Quick Checkpoint
Before building begins, a brief human checkpoint ensures alignment:
"Here is what we are building: 4 screens demonstrating the core booking flow, estimated 3 hours to complete. Ready to go?"
This is not a review meeting. It is a 30-second sanity check. If the summary does not match your vision, course-correct now - not after hours of building.
Phase 4: Speed-First Implementation
The implementation phase prioritizes speed above all else. The system follows explicit guidelines:
- Start with the wow moment - Build the most impressive feature first
- Hardcode everything - No APIs, no databases, no authentication
- Use existing components - No time for custom design work
- Skip edge cases - The happy path is all that matters for demos
This feels wrong to engineers - and that is the point. This workflow is not for building production software. It is for building demo software as fast as possible. Polish comes later, if the idea proves worth building.
Phase 5: Polish and Present
A brief polish pass ensures the demo does not embarrass you:
- Verify the critical path works end-to-end
- Remove placeholder text
- Ensure consistent styling
- Test on the expected demo device
Then the prototype is presented with clear next-step options:
- Iterate - Make changes based on your reaction
- Share - Get instructions for showing stakeholders
- Productionize - Generate a roadmap for making it real
- Done - The prototype served its purpose
The workflow recognizes that a prototype is a means to an end. Your goal is learning, not shipping.
The Visual Workflow Experience
In limerIQ's visual editor, the rapid prototype workflow appears as a streamlined pipeline. Unlike comprehensive product workflows with dozens of stages, this one is deliberately minimal: idea capture, blueprint, checkpoint, build, present.
When you run the workflow, you can watch progress in real time. The checkpoint stage pauses for your input, clearly indicating what decision is needed. The build stage shows activity as screens come together. The entire experience is designed to feel fast because it is fast.
For teams evaluating multiple ideas, you can run the prototype workflow several times in parallel on different concepts. Compare the resulting demos side by side. Let stakeholders click through each one. Make investment decisions based on tangible artifacts rather than abstract descriptions.
What This Workflow Is Not
To be clear about scope:
Not a production pipeline. There are no tests, no CI/CD, no documentation, no error handling, no security considerations. These are all important - for production. This is for validation.
Not a design tool. The workflow uses standard UI components and opinionated technology choices. If you need pixel-perfect designs, involve a designer after validation confirms the concept is worth that investment.
Not a replacement for user research. A clickable prototype helps you get feedback, but it does not tell you who to show it to or what questions to ask.
Not magic. You still need a coherent product idea. The workflow captures and implements your vision - it does not create one for you.
Real-World Use Cases
Investor Demos
You have a pitch meeting in two days. Instead of slide deck mockups, you walk in with a functional prototype investors can click through. The difference in perceived credibility is substantial.
Stakeholder Alignment
Two executives have different visions for a feature. Build both as quick prototypes. Let them click through each version. The discussion becomes concrete instead of abstract.
User Testing
Before committing development resources, put a prototype in front of five users. Watch where they click, what confuses them, what excites them. Iterate the prototype. Then build with confidence.
Personal Validation
You are not sure your idea is good. Build a prototype in an afternoon. If you are not excited showing it to someone, you learned something valuable. If you are excited, you have something to build on.
The Speed Advantage
Consider the time comparison:
Traditional Path
- Spec writing: 2-3 days
- Design mockups: 3-5 days
- Development: 2-4 weeks
- Total: 3-5 weeks to first feedback
Prototype-First Path
- Idea capture: 15 minutes
- Blueprint: 30 minutes
- Implementation: 2-4 hours
- Total: One afternoon to first feedback
The math is compelling. Even if you throw away the prototype and start fresh three times, you are still ahead of the traditional timeline. And each iteration teaches you something.
Getting Started
To use the rapid prototype workflow:
- Have an idea ready - It does not need to be fully formed, but you need something to describe
- Clear your calendar - The workflow works best when you can respond to questions and checkpoints in real time
- Prepare to demo - Think about who you want to show the result to
Open the workflow in limerIQ with a simple description of your idea. Let the conversation guide you. Watch your idea transform from abstract concept to something you can click.
The goal is not to ship. The goal is to learn. And the faster you can build something to react to, the faster you learn whether your idea is worth building for real.
Related articles: